

Introduction
Note: This tutorial equally applies to creating plugins for both the Bukkit and Spigot plugin API’s. For simplicity’s sake, I am going to assume you are running a Spigot server.
Creating a plugin to install on a Spigot server is made easier using a build automation tool such as Gradle. Although you can create your plugin by downloading the required API libraries and any dependencies, this can quickly become very burdensome and error prone. Also, managing the libraries and executing a bunch of build commands distracts from your real purpose – building an interesting and high quality plugin.
This tutorial assumes you have some basic knowledge of Java programming. It also assumes you have a Spigot server already running where you can deploy your newly created plugins.
This tutorial is a companion to the official Bukkit Plugin Tutorial, which can be found by following this link: https://bukkit.gamepedia.com/Plugin_Tutorial.
The official tutorial uses the Maven build automation tool, and the Eclipse Integrated Development Environment to create a plugin. In this tutorial, we will use the Gradle build automation tool to accomplish the same task. Gradle can be easier to deal with, since it uses a simple scripting language to define the plugin build process. Gradle and Maven share many assumptions about how a project should be structured; any previous experience you have with Maven – including completing the official Bukkit Plugin Tutorial – will prove helpful when using Gradle.
The steps required to build a Spigot plugin are:
- Install a Java SDK
- Install Gradle
- Set your development environment using environment variables.
- Start building!
These topics will all be covered in this tutorial. At the end you will have a working plugin that you can install in your Spigot server. Once you have completed this tutorial, you can switch over the official Bukkit Plugin Tutorial to continue learning about adding features to your plugin project.
Install a Java SDK
When creating your plugin, you will be writing Java code. In order to translate the Java code into a program your computer can run, you will need to compile it into bytecode. It is this bytecode that the Java Runtime Environment (JRE) can execute to produce a running program.
You likely already have a JRE installed on your computer. It is required to run Minecraft Java Edition. If you have ever run the “java” command to start a program, then you have used the JRE.
However, in order to create Java programs, you will need to install a Java Software Development Kit (SDK). The SDK provides additional commands, including “javac” – the Java compiler. This is the program that translates your code into something the JRE can run.
There are many different distributions of the JDK available, all of which have their strengths and weaknesses. I primarily use a distribution from Red Hat, called the Red Hat OpenJDK. I have used this JDK distribution to build Spigot plugins, as well as run the Spigot server, and have found it to be reliable and easy to work with. One downside to the Red Hat OpenJDK is the download process. Red Hat requires that you create a Red Hat account, and provide information like your employer and phone number. This is because Red Hat is in the business of selling enterprise software to large customers.
For this tutorial, I am going to use Amazon Corretto 8. This is a distribution of the OpenJDK by Amazon that does not require any registration or logins to download and install.
To download a Windows MSI installer for Amazon Corretto 8, you can use this download link. It will download the latest version that is available: https://corretto.aws/downloads/latest/amazon-corretto-8-x64-windows-jdk.msi.
Run the MSI installer, and accept all the default values. Amazon Corretto 8 is also available for Mac OS and Linux users. To find installers for these platforms, visit this web page: https://docs.aws.amazon.com/corretto/latest/corretto-8-ug/downloads-list.html.
Install Gradle
The instructions for installing Grade on any operating system can be found at this website: https://gradle.org/install/. This tutorial assumes you are using Windows 10.
To start the installation, create a new directory on your computer called C:\Gradle. This can be accomplished using either File Explorer, or using the “mkdir” command from the Command Prompt.
Now, download the Gradle Binary distribution. This distribution has all that you need to use Gradle. There is a Source distribution as well, but that is meant for developers who will be hacking on the Gradle code itself.
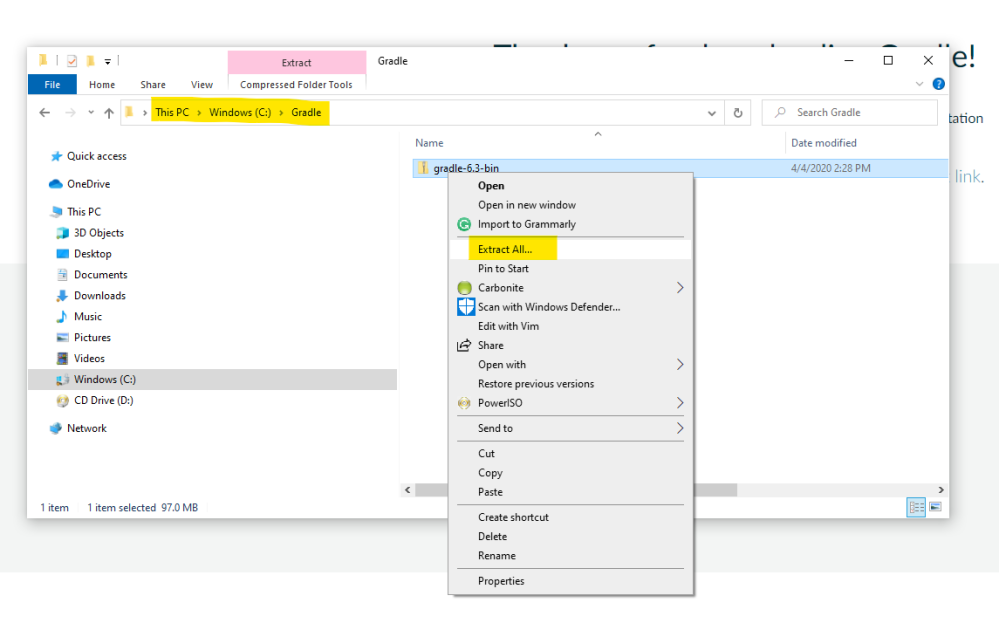
The most current version of the Binary distribution when this tutorial was written was at: https://gradle.org/next-steps/?version=6.3&format=bin. This will download a ZIP file to your computer. Copy this ZIP file to the C:\Gradle directory that you created earlier. You can Unzip this file using File Explorer by right-clicking on the ZIP file, and selecting “Extract All…”. Accept any default values, and you will end up with a new directory called something like “gradle-6.3-bin” in your C:\Gradle directory. At this point, Gradle is installed on your computer.
Set Environment Variables
For the rest of this tutorial, we will be using the Windows Command Prompt to execute the commands needed to create and build our plugin project. In order for the Java and Gradle commands to work properly under the Command Prompt, we need to set some environment variables. These tell the Command Prompt where to look for your installed programs.
Start by opening the Command Prompt, and creating a new directory for your plugin project. In this tutorial, I am using the directory C:\code-demo. You can make this directory by issuing these three commands:
cd \

mkdir code-demo

cd code-demo
Your command prompt should now say C:\code-demo, indicating that you are in the newly created directory.
I find that the easiest way to set environment variables is to create and execute a batch file. Using Notepad (or any other text editor), create a new file called setenv.cmd and add these lines of text to the file. Don’t forget to save!
set GRADLE_HOME=c:\Gradle\gradle-6.3-bin\gradle-6.3
set PATH=%GRADLE_HOME%\bin;%PATH%
This file sets two environment variables. The first, GRADLE_HOME, should be set to the path where you installed Gradle. If you followed this tutorial exactly, it should be pretty close to the path you need. You may need to adjust the version number to match the distribution you downloaded.
The second line adds the \bin (or binary) directory of GRADLE_HOME to your PATH. This is where the Command Prompt will look for commands when you execute them. Amazon Corretto should automatically add its \bin directory to the path.
Once you have created and saved this file, you may now run the setenv.cmd command. The output should look something like this:
C:\code-demo>setenv.cmd
C:\code-demo>set GRADLE_HOME=c:\Gradle\gradle-6.3-bin\gradle-6.3
C:\code-demo>set PATH=c:\Gradle\gradle-6.3-bin\gradle-6.3\bin;C:\Program Files\Amazon Corretto\jdk1.8.0_242\bin;C:\WINDOWS\system32;C:\WINDOWS
C:\code-demo>
In the final line, you can see that the \bin directories for both Gradle and Amazon Corretto are in your path. You should verify this by typing the two commands shown below. If you get an error message like “gradle is not recognized as an internal or external command”, then double-check the GRADLE_HOME and PATH that you have set in the setenv.cmd file.
C:\code-demo>java -version
openjdk version "1.8.0_242"
OpenJDK Runtime Environment Corretto-8.242.08.1 (build 1.8.0_242-b08)
OpenJDK 64-Bit Server VM Corretto-8.242.08.1 (build 25.242-b08, mixed mode)

C:\code-demo>gradle -version

------------------------------------------------------------
Gradle 6.3
------------------------------------------------------------

Build time:   2020-03-24 19:52:07 UTC
Revision:     bacd40b727b0130eeac8855ae3f9fd9a0b207c60

Kotlin:       1.3.70
Groovy:       2.5.10
Ant:          Apache Ant(TM) version 1.10.7 compiled on September 1 2019
JVM:          1.8.0_242 (Amazon.com Inc. 25.242-b08)
OS:           Windows 10 10.0 amd64

C:\code-demo>
Running these two commands tells you a few important things. The first is that the programs were installed correctly, and that your PATH is set correctly. The second, is that the version of Java which Gradle will use is the one you just installed. You can tell this because the version number displayed for the JVM attribute of the “gradle” command matches the version number produced by the “java” command.
We are now ready to start building our plugin!
Create Your Gradle Project
One of the features of Gradle is the ability to create a shell project using the Gradle command, so that you don’t have to start writing your code from scratch. Besides being a time-saver, this also ensures that the directory structure of your project is set up correctly. Gradle is a class of build tools called “opinionated software”. Another common phrase describing tools like Gradle is “convention over configuration”. This means that Gradle expects your project to be set up a certain way. For example, rather than tell Gradle where your Java source code is located (configuration), you put it where Gradle expects it (convention). This can greatly reduce the size of your build script, reducing the chances of introducing an error. Also, one Gradle project looks like all other Gradle projects, which makes it easier to find your way around someone else’s software projects.
Gradle supports several types of “starter” projects, which it calls “init types”. If you don’t specify an “init type” when starting your Gradle project, you will get a Java application. For creating a Spigot plugin, you need to create a slightly different type of application – a Java library. This is because you will not be running your Java program as a standalone program – you will be installing into another Java program; namely, the Spigot server.
Let’s get started. Enter this command to create your Gradle project. Make the selections shown below when prompted. It is recommended that you provide a unique source package name, so that your Spigot plugin won’t interfere with other plugins (and vice-versa). For this tutorial, you can use the provided package name.
C:\code-demo>gradle init --type java-library
Starting a Gradle Daemon (subsequent builds will be faster)

Select build script DSL:
  1: Groovy
  2: Kotlin
Enter selection (default: Groovy) [1..2] 1

Select test framework:
  1: JUnit 4
  2: TestNG
  3: Spock
  4: JUnit Jupiter
Enter selection (default: JUnit 4) [1..4] 1

Project name (default: code-demo): FirstPlugin
Source package (default: FirstPlugin): com.keithlawless.demo

> Task :init
Get more help with your project: https://docs.gradle.org/6.3/userguide/java_library_plugin.html

BUILD SUCCESSFUL in 1m 46s
2 actionable tasks: 2 executed
C:\code-demo>
After running the init command, your project directory will look like this:
C:\code-demo>dir
 Volume in drive C is Windows
 Volume Serial Number is F65E-0D39

 Directory of C:\code-demo

04/11/2020  04:13 PM              .
04/11/2020  04:13 PM              ..
04/11/2020  04:13 PM               160 .gitattributes
04/11/2020  04:13 PM               108 .gitignore
04/11/2020  04:12 PM              .gradle
04/11/2020  04:13 PM               982 build.gradle
04/11/2020  04:12 PM              gradle
04/11/2020  04:12 PM             5,764 gradlew
04/11/2020  04:12 PM             3,056 gradlew.bat
04/11/2020  04:10 PM                88 setenv.cmd
04/11/2020  04:13 PM               368 settings.gradle
04/11/2020  04:13 PM              src
               7 File(s)         10,526 bytes
               5 Dir(s)  903,912,562,688 bytes free

C:\code-demo>
Gradle created three sets of files and directories for you:
- Some Git configuration files (.gitattributes and .gitignore). These will be useful if you later check your code into the Git version control system. Note that your project directory is not automatically put under Git version control – you still need to use the “git init” command to do that.
- Some Gradle files including the Gradle Wrapper. The Gradle Wrapper allows you to distribute your code to someone who does not already have Gradle installed. The Wrapper will download and install the correct version of Gradle for your project (if needed) whenever someone runs a Gradle command.
- Your project files.
The files that are actually part of your project file are:
build.gradle– this is your actual Gradle build file.settings.gradle– this contains some project-specific settings, like the project name.- The
/srcdirectory – this is where your Java code and other project files live.
build.gradle
Open the build.gradle file in your favorite text editor. If you don’t have a favorite text editor, I recommend Microsoft Visual Studio Code (https://code.visualstudio.com/). It is available on all platforms at no cost, and is an excellent code editor.
The first thing we need to do is add a Maven repository where we can download the Bukkit and Spigot API libraries. Libraries that your project uses are generally called “dependencies”. Add a line to the “repositories” section of the build file, such that it looks like this:
repositories {
    // Use jcenter for resolving dependencies.
    // You can declare any Maven/Ivy/file repository here.
    jcenter()
    maven {
        url "https://hub.spigotmc.org/nexus/content/repositories/public/"
    }
}
The “dependencies” section is where you list your project’s dependencies. Each dependency includes two parts – how you are using the dependency, and the name of the dependency. The name in turn typically has three parts separated by a colon: the groupid, the artifactid, and the version. This allows Gradle to find your dependencies in the various repositories your build file uses.
Gradle provides some example code in the “dependencies” section. We are going to remove this sample code, and replace it with two lines that state that we need both the Bukkit and Spigot API libraries. When finished, your “dependencies” section should look like this:
dependencies {
    implementation 'org.bukkit:bukkit:1.15.2-R0.1-SNAPSHOT'
    implementation 'org.spigotmc:spigot-api:1.15.2-R0.1-SNAPSHOT'

    // Use JUnit test framework
    testImplementation 'junit:junit:4.12'
}
You can now save and exit this file. At this point, we can actually build our project and product a Java library file. This library contains no actual code we’ve written; however, it’s not a bad test to make sure our build file is correct.
Run the command “gradle build” and make sure your library gets built. You should see output similar to this:
C:\code-demo>gradle build

BUILD SUCCESSFUL in 15s
4 actionable tasks: 4 executed
C:\code-demo>
You will notice that a new directory has been added to your project directory called “build”. Within that directory is a new directory (among others) called “libs”. Within that directory is our new Java library called FirstPlugin.jar. This is the file that we would copy to our Spigot server’s “plugins” directory to deploy our new plugin.
Code the Plugin
Let’s write some code!
In your project directory, navigate to this directory (relative to your project’s base directory). If you selected a different package name when creating the project, your directories from “com” on down will reflect your package name.
src/main/java/com/keithlawless/demo/
In this directory, Gradle has generated a sample Java source code file called Library.java. You can delete this. In its place create a new file called FirstPlugin.java. This will contain your plugin’s code.
In FirstPlugin.java, we are going to create a new Java class called FirstPlug that extends Bukkit’s JavaPlugin class. To do that, we will also need to import the JavaPlugin class. For now, that is all the code you need:
package com.keithlawless.demo;

import org.bukkit.plugin.java.JavaPlugin;

public final class FirstPlugin extends JavaPlugin {

}
Gradle also created a unit test for the sample Library.java class. This file is called LibraryTest.java and is located under the directory /src/test/java/com/keithlawless/demo. Delete this file before proceeding; otherwise, the unit test will fail when building your plugin.
Spigot also requires a plugin.yml file that describes your plugin. This file is required – without it your plugin will not load into the Spigot server. You should create this file in the resources folder located at:
src/main/resources/
This folder was created for you by Gradle.
The plugin.yml file can contain many lines of code describing your plugin. We are going to create the simplest possible plugin.yml file for now. Enter this text into your plugin.yml file:
name: FirstPlugin
main: com.keithlawless.demo.FirstPlugin
version: 1.0
The “name” field is simply your plugin name. The “main” field contains the fully qualified name for your plugin. This is the combination of your package name, and the class name of your plugin. This tells Spigot what class to run when it loads your plugin. Finally, the “version” field contains the current version number of your plugin.
At this point, our plugin still does not actually do anything. However, if you were to build this plugin and deploy it to your Spigot server, the server will load your plugin.
>reload

*** A bunch of server logs not shown for brevity ***

[17:33:10] [Server thread/WARN]: Initializing Legacy Material Support. Unless you have legacy plugins and/or data this is a bug!
[17:33:12] [Server thread/WARN]: Legacy plugin FirstPlugin v1.0 does not specify an api-version.
[17:33:12] [Server thread/INFO]: [FirstPlugin] Loading FirstPlugin v1.0
[17:33:12] [Server thread/INFO]: [FirstPlugin] Enabling FirstPlugin v1.0
[17:33:12] [Server thread/INFO]: Server permissions file permissions.yml is empty, ignoring it
[17:33:12] [Server thread/INFO]: CONSOLE: Reload complete.
Conclusion
At this point you have created a working shell of a Spigot plugin, and have a Gradle project configured to allow you to build your plugin.
You should now go to the official Bukkit Plugin Tutorial, and start at Section 6 – “onEnable() and onDisable()” (https://bukkit.gamepedia.com/Plugin_Tutorial#onEnable.28.29_and_onDisable.28.29). The official tutorial will pick up right where this tutorial stops. The rest of the official tutorial demonstrates adding features to your new plugin. As you add features to your plugin, you can simply run the “gradle build” command from your project directory to create your plugin library.
The code for this tutorial is available on Github at https://github.com/keithlawless/Tutorial-Create-A-Spigot-Plugin.
